Spring Validation (1)
in Programming on Spring
Spring에서 (Form) Validation 사용법
- http://hibernate.org/validator/ 로 이동
- latest stable 버전으로 zip 파일 다운받아서 압축 해제
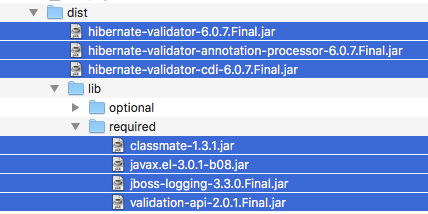
아래 파일들 복사해서 Spring Project의 WEB-INF/lib 폴더에 복사

- Controller Class 안에 InitBinder 작성
(앞뒤 공백 제거 및 공백만 입력된 값을 null로 바꿔줌)@InitBinder public void initBinder(WebDataBinder dataBinder) { StringTrimmerEditor stringTrimmerEditor = new StringTrimmerEditor(true); dataBinder.registerCustomEditor(String.class, stringTrimmerEditor); } - Model Class에 사용할 validation을 annotation으로 정의함
public class Customer { private String firstName; @NotNull(message="is required") @Size(min=1, message="size have to be 1") private String lastName; ... - 정규식으로 정의할 수도 있음
@Pattern(regexp="^[a-zA-Z0-9]{5}", message="only 5 chars/digits") private String postalCode; - Controller에서는 에러가 있을 경우 다시 입력폼으로 이동
@RequestMapping("/processForm") public String processForm( @Valid @ModelAttribute("customer") Customer theCustomer, BindingResult theBindingResult //Model바로 다음에 와야함. ) { if (theBindingResult.hasErrors()) { return "customer-form"; } else { return "customer-confirmation"; } } - 입력 Form에서는 전송받은 에러 표시
Postal Code:  <form:input path="postalCode" />
<form:errors path="postalCode" cssClass="error" />
커스텀 메세지를 사용할려면 먼저 src폴더안에 resources 폴더 생성 후
messages.properties 파일을 생성한다.
- BindingResult의 error메세지를 참조하여 messages.properties에 메세지 정의
typeMismatch.customer.freePasses=Invalid number - spring config 파일에 아래 코드 추가
property의 value가 resources폴더의 messages.properties를 참조
- BindingResult의 error메세지를 참조하여 messages.properties에 메세지 정의
<!-- Load custom message resources -->
<bean id="messageSource"
	class="org.springframework.context.support.ResourceBundleMessageSource">
	<property name="basenames" value="resources/messages" />
</bean>
다음은 Custom Validation을 사용해보자.